Have you ever found yourself deep in a feature branch, with multiple uncommitted changes, only to be interrupted by a critical bug report on main?
Traditionally, you had two choices:
- Stash and Switch: Run
git stash, switch branches, fix the bug, commit, switch back, and rungit stash pop. This context-switching can disrupt your focus and break active local builds. - Clone Again: Clone the repository to another folder entirely. This wastes disk space and time, duplication of the object database, and leaves you managing separate local repositories.
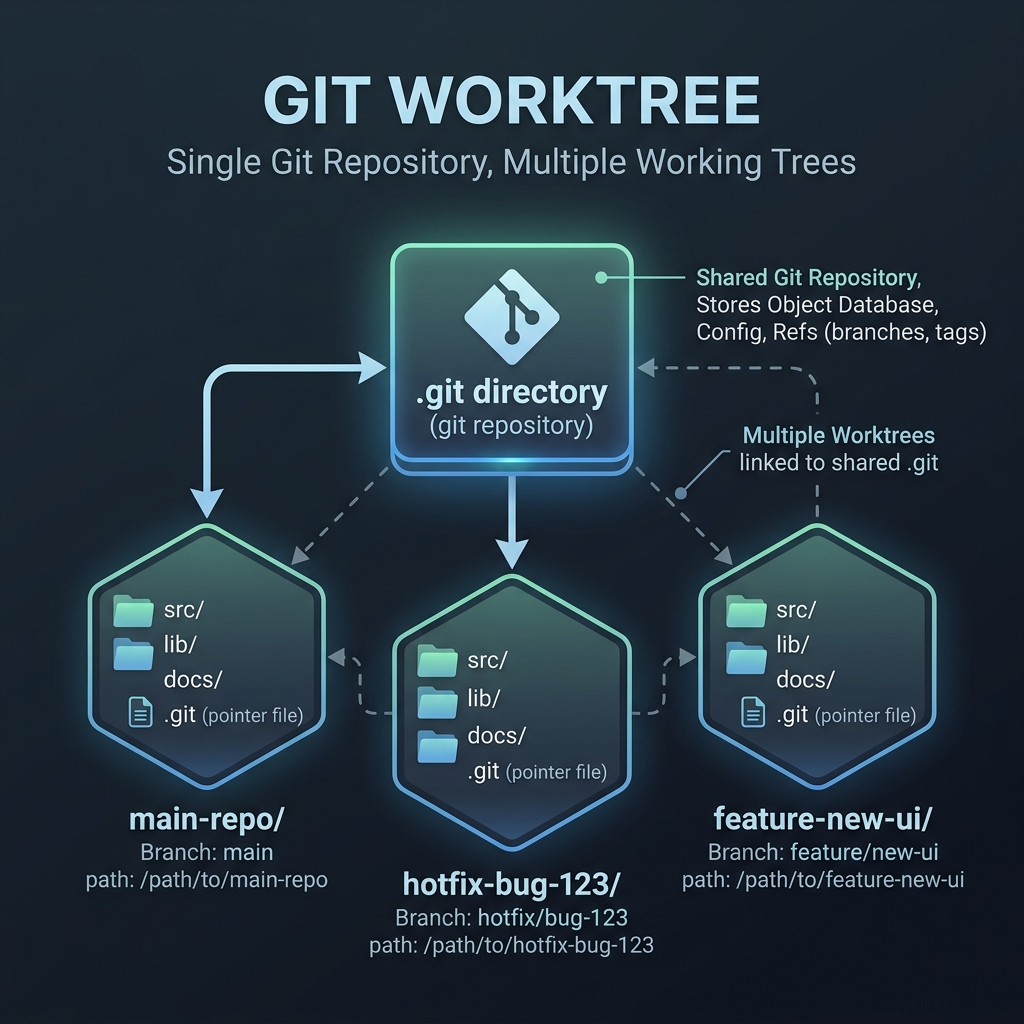
Fortunately, Git provides a third, elegant solution: git worktree. This feature allows you to attach multiple working directories (worktrees) to a single local repository, allowing you to checkout and work on different branches concurrently.
Git Branch vs. Git Worktree
Here is how Git Worktree stacks up against standard branch switching and multiple repository clones:
| Feature | Standard Git Branch (Single Checkout) | Git Worktree (Multiple Checkouts) | Multiple Clones |
|---|---|---|---|
| Active Branches | Only one branch can be checked out at a time. | Multiple branches checked out simultaneously in different folders. | Multiple branches in different folders. |
Git Database (.git) |
Shared single instance. | Shared single instance (all worktrees point to the same main .git database). |
Independent copies (disjoint history and refs, duplicates database). |
| Disk Space | Minimal. | Minimal (only checks out the files needed for each directory). | High (each clone duplicates the object database). |
| Local Stashing Required | Yes, if you have uncommitted work. | No; just open a new folder for the hotfix while keeping your feature work in progress. | No. |
| Best For | Sequential task progression. | Concurrent tasks (e.g., hotfixes, reviewing PRs, running tests in background). | Separate forks or independent repos. |
How Git Worktree Works
Rather than duplicating the entire Git history and configuration, git worktree sets up a main repository with additional linked checkouts. Each worktree directory contains its own files and a special .git file that points back to the main repository’s .git database.
Hands-On: Working with a Mock Repo
Let’s walk through a complete, hands-on workflow to see git worktree in action.
Step 1: Create a Mock Repository
First, we will set up a main repository with an initial commit:
|
|
Step 2: Work on a Feature Branch
Let’s start working on a new feature branch feature/cool-stuff:
|
|
Step 3: Switch to a Hotfix using a Worktree
Suddenly, a critical bug is reported in main. Instead of stashing our uncommitted work in feature/cool-stuff, we can create a new worktree directory ../my-project-hotfix specifically for the hotfix:
|
|
This creates a new folder my-project-hotfix outside of your current folder. Git automatically sets up the files, pointing them back to your main database.
Step 4: Fix the Bug in the Worktree
Navigate to your newly created hotfix directory and apply the fix:
|
|
Because your feature work remains in my-project, it is completely untouched!
Step 5: Verify the Worktree Structure
Go back to your main repository directory to view the list of active worktrees:
|
|
This command will list all active directories linked to the repository:
|
|
Step 6: Cleaning Up
Once you are done with the hotfix (e.g., after pushing it or merging it to main), you can safely remove the worktree folder.
Now let’s merge the hotfix back into main:
|
|
In modern versions of Git, you can remove the worktree cleanly with:
|
|
Alternatively, you can manually delete the folder and prune the references:
|
|
Quick Reference Commands
Here are the most common git worktree commands:
| Command | Description |
|---|---|
git worktree add <path> <branch> |
Create a new worktree at <path> checking out <branch>. |
git worktree add -b <new-branch> <path> <base-branch> |
Create a new worktree at <path> with a new branch <new-branch> tracking <base-branch>. |
git worktree list |
List all active worktrees linked to the repository. |
git worktree remove <path> |
Remove a worktree directory and clean up its references. |
git worktree prune |
Clean up worktree information for directories that were deleted manually. |
Using git worktree keeps your workspace clean, speeds up switching between context, and optimizes your machine’s disk space. Give it a try on your next context switch!
Last modified on 2026-06-27